DIY St. George ribbon brooches. We make a St. George ribbon for Victory Day using the kanzashi technique. DIY St. George ribbon made from ribbons
Black and orange kanzashi petals together look very patriotic. Why? Yes, because these are the colors that make up the famous St. George’s ribbon - a symbol of the Great Victory of the Soviet people in the Great Patriotic War. If you don’t yet have a suitable accessory for May 9, be sure to purchase it, or better yet, make a brooch with your own hands to try on the decoration for yourself before the parade or give it as a gift to your grandparents. Even if they did not fight as children, they knew the hardships of war, and from a young age they worked hard in the rear, bringing the great Victory Day closer.
If you like the brooch offered in the creative lesson, look at the step-by-step description of the work and get to work, because May 9 is not far away.
Select from your craft chest the following:
- — 16 pieces of black satin ribbon — 1.2*5 cm;
- - 13 pieces of orange ribbon - 1.2*5 cm;
- - 10 pieces of gold brocade - 2.5 * 2.5 cm;
- - 9 pieces of orange ribbon - 2.5 * 2.5 cm;
- - felt circle with a diameter of 3 cm;
- - 3 pieces of gold cord - two 6 cm and one 8 cm;
- - hugger with a circumference of 2 cm - 1 piece;
- - black half bead with a circumference of 1.4 cm - 1 piece;
- — black beads – 9 pieces;
- - brooch, St. George ribbon - 4*25 cm.
Stages of modeling a brooch
1. The list of accessories contains all the names of materials that will be needed to model a beautiful brooch for the wonderful May holiday. Narrow pointed petals will be made from a thin ribbon of two colors, and standard sharp kanzashi petals will be made from squares. A half bead with a hugger should be placed in the center of the flower, and small black beads and laces will become dangles that will decorate the brooch.

2. To make the oblong petals, take 1.2 cm wide pieces of tape. At this stage you will need orange and black parts. Place a piece of tape vertically in front of you and mentally mark the middle. Bend in the central part at an angle of 90 degrees, but not towards yourself, but to the side. Next, bend the part of the segment curved to the side down, aligning the two sides of the right angle. The result should be a figure resembling a house. This will be the base of the flat petal. All such details in orange and black colors will be used on the lower and upper tier of the flower. At the base, the prepared part should be folded to obtain a special envelope. Use glue or a lighter for this step.

3. According to the method indicated in the previous paragraph, prepare all black (16 pieces) and all orange (13 pieces) petals for further work. Cut out a black felt circle.

4. Bend orange squares with a side of 2.5 cm in the standard way. As a result, you should get small sharp kanzashi petals (single). Bend diagonally, and then along the height of the triangle. Round off the details. There is no need to cut the ribbon at the back; the petals should remain voluminous.
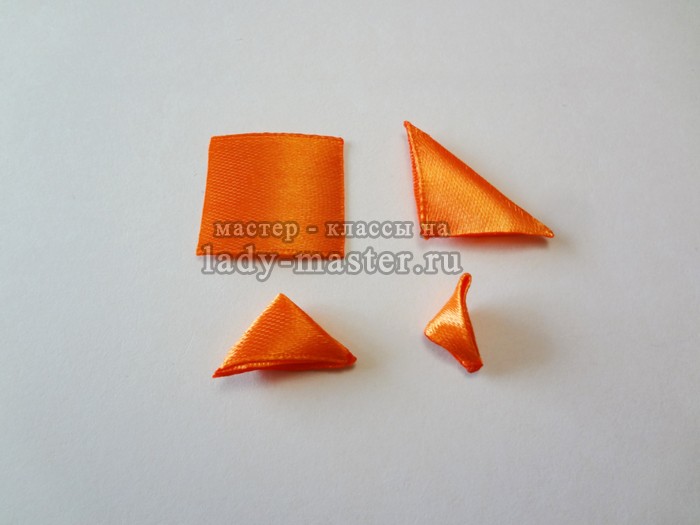
5. Turn all 9 squares of orange ribbon into these small petals. Also make sharp petals of the same type from gold brocade, but there will be one more of them - 10 pieces.

6. To pieces of golden laces (one of them should be 2 cm longer than the others) glue branches consisting of three orange petals - one trefoil to each lace. On the opposite side, string three black beads. These will be elegant pendants for brooches. Thus, the accessory will resemble an order.

7. Also fasten the golden sharp petals into twigs, but combine 5 pieces each. Thus, from 10 prepared parts, you should get 2 branches.

8. Start gluing the bottom layer of petals (black) onto the prepared felt circle. Try to place the parts symmetrically.

9. First make the bottom black layer of the flower.

10. Then add an orange layer on top, but move the petals closer to the center. Since the petals are the same size, it is necessary to move the top layer towards the center so that the black details are visible. Glue the hugger with the half bead in the center.

The St. George memorial ribbon is a popular attribute of May. Everyone associates this most blooming month of the year with the great Victory, with the gray hairs of humble veterans who did an invaluable feat for our and subsequent generations. To honor those who are still alive, to honor the memory of those who are no longer with us, we march in the Parade and take part in the Immortal Regiment event. And the St. George’s ribbon is a thin thread that unites people of the future and the past, entire generations.
This master class tells you how to make an elegant St. George ribbon with a hand-made kanzashi flower. The accessory will turn out beautiful and impressive. To decorate the brooch, you should prepare black and orange marshmallows and oval pointed petals.
To make a kanzashi brooch you will need:
- 1 piece of St. George’s (black and orange) ribbon - 2.5 * 16 cm;
- 8 pieces of St. George’s (black and orange) ribbon - 2.5 * 7 cm;
- 8 pieces of orange satin ribbon - 5*5 cm;
- 8 pieces of deep black satin ribbon - 5*5 cm;
- black felt base – diameter 4 cm (to resemble St. George’s petals);
- black felt base – diameter 3 cm (under the central black and orange marshmallow);
- felt rectangle (for a pin);
- hugger 2 cm – 1 element;
- black half bead 1.4 cm – 1 element.
How to make a brooch for May 9 step by step:
The bottom layer of the flower will be made of pointed petals, the production of which will take a St. George (reps) ribbon measuring 2.5 cm by 7 cm. To make all the petals, you should prepare 8 identical cuts. Then singe them if necessary for neat work. Bend each strip at a right angle to mark the middle. Remember that rep is much denser than satin, but it is easier to work with.

Then bend the resulting angle diagonally, aligning the two processes, clearly joining the strips. You will end up with an acute-angled piece, with a pocket visible on one side. This side will become the back of the petal; turn the whole piece towards you. At the bottom of the petal, burn the rep ends and make folds. Striped petals are all made using this technique.

Take a longer St. George ribbon, but of the same width. The parameters of the segment are 2.5 cm by 16. Bend, but not at a right angle, but at an acute angle, to get the base of the brooch. Prepare a larger black felt circle. For the bottom layer of the flower, 8 striped rep petals should be ready.

Glue all the petals into a flower, using a felt circle as the base. Next, glue the resulting blank onto the large loop. The lower part of the brooch is ready.

Proceed to the second part of the work. To make a fancy marshmallow centerpiece, prepare 5cm orange and black satin squares. Fold the pieces diagonally.

Pin the black triangle to the orange one (align them neatly across the entire surface). In the resulting multilayer workpiece, bend two sharp corners. There should be a gap in the center.

Cut off the place in the combined tape where all the corners meet, retreating by about 0.5 cm. Then bend the remainder, making a fold clearly along the side corners. Bend the resulting triangle in height, aligning the sharp corners and splitting the central gap, revealing the black tape. Glue the corners with flame.

Prepare 8 identical bright tubes for marshmallows. And also at this stage you will need a hugger with a black half-bead.

Glue the marshmallow together and glue the core into the center. All parts are glued onto a small black felt circle.

Prepare a felt rectangle with a pin.

Hi all!
On Victory Day, everyone around rejoices, laughs, remembers their loved ones who died in the war and pays tribute to them to the memory of a grateful generation. And of course, on this day a solemn atmosphere reigns everywhere.
One of the permanent attributes of the May 9 holiday is the St. George Ribbon. It is tied on arms, pinned to clothes, backpacks, depicted in posters... But why not add a little variety to the generally accepted traditions and make this symbol even more elegant?
I have put together master classes for you showing how you can make beautiful brooches or jewelry from an ordinary St. George’s ribbon in different ways. The techniques presented in this article range from the simplest to more complex ones that children will find difficult to implement without adult help. Remember that, among other things, you can do others in this topic.
Therefore, all ideas are great for family creativity and will not only be an excellent way to show your attention on May 9, but will also give you an opportunity to once again spend time with your closest people.
Kanzashi is a Japanese technique in which various products are made by folding satin ribbons in different ways. It turns out very beautiful and tender. See for yourself. Impressive, just like a real star that you can give as a gift or decorate your clothes when you come to a rally.

Materials:
- St. George Ribbon;
- Orange and black satin ribbons;
- Glue;
- Scissors;
- Lighter;
- Soldering iron;
- Ruler.

Stages:
Take a 6-centimeter piece of St. George's ribbon and fold it in half.

We cut off a corner from it using a soldering iron.

Turn it inside out. You should end up with an element like this.

Using the same principle, we make the remaining petals. We will have five of them in total.

In order to cover the not very beautiful middle, we make a small flower from satin ribbons. We start with the formation of the petals. The photo shows how they are made, I think there is no need to explain.

Glue 7 of these petals together. Glue a bead to the center. It turns out very beautiful, don’t you agree?

In the same way, you can make several versions of the brooch from the same materials.


Master class on making brooches from ribbons for Victory Day (May 9)
On this day, it seems that even the air itself is saturated with an atmosphere of solemnity! And of course, I want to match the holiday. Therefore, we will make a beautiful brooch from St. George ribbons. After all, it will symbolize and decorate our clothes or handbag. You can even hang this one in your car as a pendant, that is, make it like a keychain.
Necessary materials:
- St. George ribbon 2.5 cm wide;
- Tweezers;
- Lighter;
- Large bead or rhinestone;
- Ruler;
- Glue gun;
- Scissors;
- Brooch base.

Stages:
Cut 5 pieces of tape 5-7 cm in length.

Fold it to form a right angle.

And again from right to left.

Turn it over to the front side and make folds at the base.
Burn the end of the ribbon to create a petal.


We do the same for the rest of the parts.

Now we make a bow from a 40 cm long St. George ribbon. We fix everything with glue.

Place the formed petals in the center.

Don't forget about the base pin.

And we decorate at our discretion.

Thus, with a little more imagination, you can create several versions of the same product.


How to make a St. George ribbon from paper + templates for cutting
A very simple MK for carrying out in kindergarten. We make a St. George ribbon from paper, which could be simpler and easier. The guys will be able to pin it on their chest and will probably proudly walk around on Victory Day with a ribbon of their own making.

In order to make such ribbons, you will need to pre-print black columns on orange offset paper - as shown in the photo. Below you will see a sample of such a picture that can be printed on A4 sheet.

We cut strips according to the template.

And we add each of them.


That's all. You can go on an excursion or give gifts to veterans. Very cool and simple, isn't it?

Of course, this is a very simple option, but it is also designed for small children. Older children can be offered a more complex idea for implementation. For example, make it out of paper with the St. George ribbon included as one of the elements:


And here our imagination knows no bounds.


And now I would like to show you some more paper St. George ribbons, which you can download to your computer and print out completely free of charge. Catch patterns and use them to your health. Both color options and coloring pages are presented.


St. George's ribbon with a star (Order of Victory)
Another brooch in the Kanzashi style with a star that symbolizes the Order of Victory. In order to make it, we need:
- Tweezers;
- Rhinestones or beads;
- Glue gun;
- Scissors;
- 60-centimeter St. George ribbon;
- Ruler;
- Brooch clasp;
- Lighter or candle.

Stages:
We make 5 rectangles from the St. George ribbon, each 7 cm long.

Using one piece as an example, let's look at how the parts are formed. First we bend one corner.

Fold it again, but on the other side.

And turn the corner inward.

We bend the bottom side as shown in the photo.

Trim the bottom edge and hold it over the fire so that the bottom of the tape sticks together.

We make the remaining petals in the same way.

Now cut another piece of ribbon 20 cm long.

And fold it “according to the standard”.

We attach the base for the brooch with glue from the wrong side.

From the front we make a star in the form of a star. Glue a large bead or rhinestone as the core. The brooch is ready.

In fact, there are just a lot of ideas!

Look: each little thing is unique in its own way, but they are all equally cute.


Original St. George ribbon with carnation made from foamiran

Necessary materials:
- Red, white or green foamiran;
- Iron;
- Glue gun and rods for it;
- Regular and curly scissors;
- Brooch base;
- Floral wire;
- St. George Ribbon;
- Small balls of foam or foil.

Stages:
First of all, we make templates for making carnations. The picture shows how many parts will be needed to form each flower.

We cut off 25 cm of the St. George ribbon, sharpen the ends to make it more beautiful, and fold it as shown in the photo.

We cut out the foamiran blanks according to the templates made earlier. It is better to outline them with a toothpick: foamiran is a soft material, and the outlines of the details will be visible. But there will be no dirty pencil marks left.

We make frequent cuts on each circle so that we get thin petals. And then briefly apply the workpiece to the hot iron. You will get the same volume effect as in the photo.

We do the same with the leaves.


This is what we should get.

Now let's start assembling the flowers. We plant the circles on the wire.

We do this until all the blanks are gone. If necessary, bend the edges of the petals as needed.

We wrap the foil balls in green foamiran.

We form the base of the flower from it and, using glue, again place it on the stem.

The finishing touch.


Glue the leaves.

Attach the resulting carnation to the ribbon.


And we attach it to the tape.

This is how the craft turned out. How do you like it?

These brooches, for example, are made in the same way.

Change one detail and you will end up with a completely different product!


And at the end of the post, I would like to show you one video on this topic, perform kanzashi for the big day, and decorate them with flowers, for example, a bouquet of tulips.
In general, I urge you not to forget about such a great holiday as Victory Day, and be sure to involve children in studying the history of your state! You can make any of the brooches presented in this article if you know veterans and give them as a show of care on this significant day.
I wish you all creative success and say goodbye for now. Write, leave your ratings and comments. Until next time.
Kanzashi craftswomen can make wonderful decorations for any holiday. And the recipients of their creative imagination are not only girls and women, but also men. By February 23 or May 9, it is customary to congratulate men and veterans, and you can give them hand-made brooches of a suitable theme. The master class provides a lesson on how to create such a decoration that can be made for Defender of the Fatherland Day or the great and revered Victory Day by all of us. DIY kanzashi brooch made from St. George's ribbon consists of a simple bouquet of white flowers tied with a red ribbon, and the base is a loop of St. George's ribbon, which is relevant for May Day. To make the same gift or a similar one, for example, with flowers of a different color, study and repeat all the steps.
Materials for making a St. George kanzashi brooch with your own hands:
For the central bouquet we will need:
- 9 pieces of white satin – width 2.5 cm and length 3 cm;
- 5 pieces of green satin - width 2.5 cm and length 10 cm (during the process, these strips, bent in half, are cut diagonally with a soldering iron. To model the sepals, only cups will be needed);
- 3 pieces of gold-colored brocade – width 0.5 cm and length 10 cm;
- 1 piece of green satin – width 0.5 cm and length 5 cm (for a droplet leaf);
- 2 pieces of red satin – width 1 cm and length 6 cm;
- 2 pieces of red satin – width 1 cm and length 5 cm;
- 2 pieces of gold-colored brocade – width 0.5 cm and length 5 cm;
- 9 double-sided yellow stamens;
- golden hugger and red half bead;
- 1 piece of green felt - width 3 cm and length 1.5 cm (for the base for the composition).
DIY kanzashi brooch made from St. George's ribbon step by step:
Green stripes are intended to make the sepals of delicate white flowers. To do this, use a 2.5 cm wide ribbon. Bend the strips across exactly in the center, perfectly aligning both sides. Next, heat up the soldering iron and move it diagonally across the two-layer rectangle. A hot, sharp knife will also work (just place the blade along the line of interest and press hard). Hot metal is designed to clearly cut two-layer rectangles into two parts and simultaneously solder the tape at the cut site. You won't be able to do this with scissors. A little advice: while working, place an old towel under the pieces of fittings so as not to spoil the surface of the table.

Of the five green strips cut lengthwise, take only the part that is a pointed bag. Prepare 9 white pieces of ribbon (3 pieces for each flower). The strips on one side need to be rounded with scissors and scorched (but use the flame as quickly as possible and once). At the lower smooth edge, the petals are collected and soldered. Stamens with yellow heads will also look beautiful on a white background. Get them ready for work.

Modeling a flower, glue three white petals, open the sepal, gather together three double-sided stamens, bend them and glue them. Glue the center to the white petals, twist the flower, glue it, insert it into a green bag.

Make 3 identical flowers.

Since 5 green sepals were initially prepared, and only 3 were used to model the flowers, there will still be 2 parts left. They will be needed for additional decoration of the bouquet. Make loops from golden brocade 0.5 cm wide and 10 cm long.

Prepare red stripes: 2 pieces 1 cm wide and 6 cm long, 2 pieces 1 cm wide and 5 cm long; brocade ribbon - 2 stripes 0.5 cm wide and 5 cm long, as well as a shiny red half-bead.

Make a bow with double red and gold loops and a shiny center - a half bead inserted into the hug.

You can also make it from ribbons:
Glue the bouquet together. Gather the flowers together, glue the two remaining sepals and three gold loops to the bottom, and glue a bow in the center in front.

Stick the composition on the St. George piece or use any other ribbon, for example, red.

A do-it-yourself kanzashi brooch made from St. George's ribbon for a man is ready. The accessory can be given separately or pinned to a gift box - it will be a great decoration. Using the example of such a wonderful brooch, you can learn how to create delicate bouquets of kanzashi, which will be useful for further creative lessons.
St. George's ribbon decorated using the kanzashi technique. Master class with detailed description.
Berdnik Galina Stanislavovna, primary school teacher of the KhMAO-Ugra "Laryak boarding school for students with disabilities."
Description: This master class is intended for children of primary school age, additional education teachers, educators and creative people who love to create beautiful crafts with their own hands.
Purpose: the work can be used as an attribute on May 9, a gift for a holiday.
Target: Decoration of the St. George ribbon using the Japanese kanzashi technique.
Tasks:
1. Strengthen the skills and abilities of working with satin ribbon.
2. Cultivate a desire to make a product with your own hands.
3. Cultivate the habit of working independently, carefully, and bringing the work started to its logical conclusion.
4. Develop creativity, imagination, fantasy.
5. Develop compositional skills and aesthetic feelings.
Materials and tools:
1. Satin ribbons 2.5 cm wide (orange-black, red, green), beads.
2. Ruler, glue.
3. Scissors, lighter.

Stages of completing the craft:
1. The width of the main ribbon on which the kanzashi-style decoration will be placed is 2.5 cm.
Cut the St. George ribbon 25 cm long.

2. Cut the edges of the tape at an angle of 45 cm. Run a burning candle or lighter along the cut line.
This is necessary to maintain the neatness of the product, as the edges can become very frayed.

3. Form a curly loop. At the junction, secure the loop with a safety pin on the wrong side. The base for the satin ribbon branch is ready.

4. Let's start making a brooch in the shape of a scarlet branch.
For the branch, cut 9 squares of red satin ribbon 2.5cm wide.

5. Fold each shape twice diagonally. Hold the junction of the corners over a burning candle or lighter. You will get small three-dimensional triangles - the petals of a scarlet twig.

6. Using glue, connect 8 petals in pairs. Apply glue to one side of the petal.

7. Connect the paired petals to each other. A single leaf will close the paired branch. Apply glue to the junction of a pair of petals.

8. As a result of small painstaking work you will get a twig
only 5 cm long.

9. Prepare 2 pieces of grass-colored satin ribbon 5mm wide
5 cm long.

10. Forming a convex loop, connect both ends of each segment by running a burning candle along the edge. You should end up with two small leaves.

11. At this stage, we begin to connect the resulting parts. Position and glue the scarlet branch to the base - the St. George ribbon. Apply glue to the convex parts of the branch from the wrong side.
You can use a hot glue gun.

12. Carefully, at the base of the collected petals, place and fix two green leaves symmetrically.

13. You can “revive” a brooch with several small yellow beads
or, better yet, white.
Our symbolic decoration for May 9 is ready.

Can be attached to clothing using a safety pin.


