Crafts for an exhibition for Easter from clothespins. DIY Easter ideas: master class (photo). Easter eggs with surprise
Good afternoon. Today we continue to prepare for Easter, and we will make something new and unusual. Of course, the basis will be rabbits, chickens, all kinds of stands and baskets, pendants and Easter trees. After all, this is something that is constantly in demand.
I most of all want to dedicate this collection to children of different ages, because they are the ones who like to do everything themselves. Well, teachers, be on guard, because no one has canceled competitions in schools and kindergartens.
For you, my readers, I have selected (thanks to the Internet) a bunch of different and interesting, new and festive options, so that you can take a prize in the competition, decorate your ordinary interior at home, and also please your loved ones with an extraordinary gift. And remember, all the work is done from scrap materials!!
Let's start with a very interesting selection of souvenirs intended for school-age children. After all, it is in educational institutions that most often they organize various competitions, where both children and parents take part.
I wanted to find something truly new and colorful for you, and so that everything could be done easily and using improvised means. I hope I managed to do this.
And the first work is a yellow hen with chicks. Make the chicken itself out of paper into a cone, cutting the feathers into strips. And the chicks can be sculpted from plasticine, and the testicles can be made from kinder surprise, covering them with sparkles.

Here is a beautiful basket using the appliqué technique, plus felt decorations.

Here is a version of an excellent Easter wreath, it is made simply from thick threads and real ones, and is also complemented by various decorations.

The next decoration, a pendant or wreath, is made using the quilling technique, which we already know. It turns out very nice.

And look how cute the bunny is?! Such a simple paper craft, but it makes a good stand for paints. The work, by the way, was taken from the Country of Masters.

You can also make various three-dimensional Easter cards; for example, this is a very exciting activity for primary schoolchildren.

And look what tenderness can be made from cotton swabs, discs and corrugated paper!! Just beautiful!!

Fluffy chicken and chicks made from napkins, what do you think of this idea?! And the birch log house is very much in keeping with the theme, it looks natural. Flowers and grass can be made from woolen threads.

Here is another great egg stand in the shape of a bunny. The work is done using the origami technique, the diagram is attached below.


Interesting idea with willows. The craft itself can be made from plasticine or salt dough. It turns out to be a kind of Easter tree.

What bright cockerels!! Where would we be without them on this bright holiday!! You can use a paper tube as a basis, and then paste it over and decorate it with paper and cardboard.

In fact, the most popular crafts for Easter, as you already understood, are egg coasters. Therefore, I want to show you how easy it is to make a “Chicken” stand from salt dough, because this is an excellent material for children’s creativity.

We will need: salt dough, knife, stacks, garlic press, vegetable peeler, manicure file, toothpick, black allspice peas, brushes, paints, colorless quick-drying varnish.
Work process:
Now I suggest you watch a detailed video on this topic. The author presents a real master class. Look and remember)) And the technique is artichoke.
And a couple more pictures on this topic.
- Yellow chicks

- Easter

- Delicate stand

- Gift in the form of a painting

- Easter topiary

- Flowers for a basket

- Silk eggs


- Very bright chicken

DIY Easter crafts from plastic bottles
If you have a large stock of plastic bottles, then you have come to the right place. We will learn how to make souvenirs from them.
- Plastic basket
You will need: plastic bottles, iron, paper, glue, awl.
Work process:
1. Cut the bottom of the bottle to a height of 7 cm. Cover them with white paper and iron them so that the cuts are not sharp. Cut strips for the handle from the flat part of the bottle.

2. Using a hot awl, glue the handles.
3. Using braid and fabric, decorate the product by gluing everything with glue.

This is what the crafts look like at the end of the work.


What else can be made from plastic bottles, you ask?! Yes, whatever your heart desires: churches, animals, and any decor.
- Church

- Testicle stand

- Rabbits


- Option for decorating spring leaves

The most interesting craft ideas for Easter 2019
Well, we are coming to an end, and I want to summarize a little. When choosing this or that craft, be sure to think about what material you will make it from, and remember that the product should be clean, light, bright and cheerful, like the Easter holiday itself.
And for you there is still a small announcement of what else can be created!!
- Bead work

- Fabric bunnies

- Crafts using quilling technique

- Festive panel

- Fabric toys

- Stand options


- Pendants

- Nest

- Crochet work

- Painting eggs, putting them together to make a bouquet

- Bunnies treat bags

- Drawing and decorating with beads

- Topiary

- Souvenir made of threads

Now we can finish. I hope you liked the craft options and you will definitely find something new and interesting for yourself. Write what you will be making this year for Easter. And by the way, do you give gifts for such an event?? We usually just color eggs and bake Easter cakes with ))
They will decorate any home for Easter and will also be an excellent gift for your loved ones.
Here you will find original crafts, many of which can be made with children, as they are quite simple.
Use your imagination and try to make something truly unusual and beautiful for the holiday.
Easter themed crafts: hamburger shaped eggs
You will need:
Boiled eggs
Markers (non-toxic)
Colored paper (color: yellow)
Corrugated paper or felt (color: green)
PVA glue
Scissors.

1. Using a brown marker, draw a wide stripe just below the middle of the egg. Give the marker a few minutes to dry.
2. Draw a thin stripe above the brown stripe with a red marker and also let the marker dry.

3. Cut out small triangles from yellow paper.

4. Glue the triangles to the egg, leaving equal distance between them.
5. Cut a small strip of green crepe paper to wrap around the egg. Using PVA glue, glue it, making folds.

6. Draw white spots (seeds) on the top of the egg and you will have an Easter hamburger.

DIY Easter crafts (photo): minion-shaped eggs

You will need:
Plastic eggs (preferably yellow and blue)
Black electrical tape
Black marker
PVA glue
Toy plastic eyes (you can also draw them with a marker).
1. Separate the blue and yellow eggs and connect them so that the bottom is one color and the top is another.

2. Cut a thin strip of black electrical tape and stick it to the egg.
3. Glue plastic eyes on top of the electrical tape.
4. Use a marker to draw hair and a smile.

Video instruction
Crafts for Easter (video): a huge Easter egg in the form of a minion
Craft an egg for Easter: eggs in the shape of Super Mario

Carefully: If you use real eggs, you can't eat them after painting them because acrylic paints are used.
You will need:
Acrylic paint and brush
Simple pencil

* Boil the eggs hard.
*To draw faces, use a simple pencil. If you find it difficult to draw faces, you can choose other, easier characters from a popular video game.

*After applying the first word of each color, let the paint dry for a couple of hours and apply a second coat.

* For small details, use a felt-tip pen (marker).
Original crafts for Easter: eggs in the form of emoticons

You will need:
Real (hard-boiled) or artificial eggs (plastic or papier-mâché)
*If you are using real eggs, it is best not to use them after dyeing.
Acrylic paint and brush
Markers

1. Paint the eggs yellow and let them dry.
2. Start drawing different emojis using both paint and markers.

DIY craft on the theme "Easter": piñata egg
First, you will need to make a ball using the papier-mâché technique. Here's how it's done:
Next, we decorate the ball with colored or corrugated paper with chopped fringe.

Easter: DIY crafts (master class)
Basket with eggs painted with sponges

You will need:
White cardboard or thick white paper
Brown cardboard
Acrylic paints or gouache
Small sponges
Scissors
Simple pencil
PVA glue
Brown marker.
1. On white cardboard, draw the shape of a basket with a simple pencil and cut it out.
You can find a simple basket design online and print it out, then trace the basket shape on cardboard and cut it out.

2. Glue the basket to another thick sheet of a different shade.
3. Cut eggs from several sponges.

4. Prepare paints of different colors.

5. Apply paints to a palette or paper plate, begin to dip the sponges into the paint and apply a “stamp” over the glued basket.

6. Cut several short strips from brown cardstock. Glue the strips to the basket.

7. You can draw the pen with a brown felt-tip pen or pencil.

DIY crafts for Easter using improvised materials: colorful Easter tree

Colored artificial feathers
Small branches
Artificial eggs of different sizes (preferably plastic, because they are light)
* you can use toy, plasticine and small wooden eggs.
Hot glue or clear tape

1. Glue feathers to the branches using hot glue or clear tape.
2. Cut the tape into small pieces and attach them to the eggs using glue or tape
* You can create various other decorations from colored paper, cardboard or felt and glue ribbons or string to them to hang on the branches.

3. Decorate the branches as you wish.


Crafts for Easter step by step: eggs in the form of fruits and vegetables

You will need:
Eggs (natural or artificial)
Green felt
Hot glue
Egg paint and markers or acrylic paint and brush.
1. Color eggs to match the color of your desired fruits and vegetables.

Strawberry: Apply red paint first, let dry and then apply white dots.
Watermelon: Apply dark green paint, let dry and paint stripes of light green or yellow paint on top.
A pineapple: Paint the egg yellow, let it dry and apply stripes with a red or orange felt-tip pen.
Corn: paint the egg yellow, let dry and add white spots.

2. For each fruit or vegetable, cut out appropriately shaped leaves from green felt (see pictures) and glue them to the eggs.

*For the pineapple leaves, make a cut at the bottom of each leaf, cross the ends and glue the leaf to the egg, then add the remaining leaves.

Beautiful crafts for Easter: Easter egg made from buttons and pins

You will need:
Styrofoam egg (can be found at any craft or office supply store)
Tailor's pins
Multi-colored buttons
Satin ribbons
Hot glue.
1. Pin the buttons to the foam egg until it is completely covered.
2. Glue on a ribbon bow.
Bead crafts for Easter (step by step)

You will need:
Styrofoam egg
Sequins (can be of different sizes)
Carnation pins
Narrow ribbon.

Simply string the sequins and beads onto a pin, and insert the pin into the foam egg. Cover the entire egg in this way.


DIY Easter crafts: egg using papier-mâché technique

You will need:
Balloon
Corrugated paper
Plain white paper
Hot glue
Flour or starch to make a paste.
1. First inflate the balloon, it should not be too big.
* To make it more convenient to work with the ball, hang it on a rope or place it on a jar or lid of a suitable size.
2. Cut white and corrugated (crepe) paper into squares.
3. It's time to make a paste from flour or starch. Here's how to do it:
4. Start coating the squares in paste and sticking them onto the ball in random order. Cover the entire ball with squares.
*Make a few more layers like this and let the craft dry.
5. Remove the ball.
6. Draw a window in the paper egg and cut it out.
7. You can decorate the window as you like. Use colored or corrugated paper, buttons and other materials and glue them with PVA glue or hot glue. Add a ribbon on top, which can also be attached with hot glue.
Inside the craft you can place Easter eggs on artificial grass, a chicken or other suitable decorations.
Crafts for Easter from threads: airy Easter eggs

You will need:
Styrofoam egg
Threads of different colors
Glue and brush
Tailor's pins
Cling film.
1. Wrap the Styrofoam egg in cling film.
2. Start piercing the foam with pins as shown in the image (large and small oval).

3. Start wrapping the egg with threads from one row of pins to the other, leaving a window where the small oval of pins is (on the side).

4. Lubricate the workpiece well with glue and leave the glue to dry.
5. Remove the foam.

6. Now you need to make the second half of the egg. To do this, you need to wrap exactly half of the egg with thread and repeat steps 4 and 5.
7. Glue both halves; you can tie a tape to the gluing point (it can also be secured with glue in some places).
Crafts for Easter (photo): Easter composition

You will need:
Light cup
Hot glue
Fork or thick wire
Artificial grass and color
Decorations (eggs, chicks, leaves).


PS).
search
Tips for photographing crafts) or filmed (see how to upload a video).
Attention: Terms of use
Well, here I am with you again, hello! Recently, you and I learned how to make and decorated them ourselves right at home. What are they for? Well, of course, for the smallest symbol of a magnificent holiday. Have you guessed it? It's Easter!
And of course, we will talk about how to make a fragile and at the same time beautiful original egg and put it in a souvenir package to give it to someone dear to your heart.
How do you like this idea? I think that you will be happy if you put together a cool souvenir from what you have on hand, because it’s so nice to give gifts and presents to your relatives and friends. Let's not waste time, let's start creating great toys.
What do you think can be used to make an egg for Easter crafts? Write your assumptions and ideas at the bottom of the article, share new ideas with me and other subscribers, if it’s not difficult for you.
Don’t forget that you can not only build an egg yourself, but also take an ordinary chicken egg and cool it
DIY Easter eggs for kindergarten and school
Well, let's start with the simplest and most uncomplicated products, because preschoolers and school-age children, especially if this is an elementary school, do not need too difficult work. They simply cannot cope with them and will be disappointed.
As a basis, you can take this beautiful masterpiece, which is made of cardboard and colored paper.
As always, plasticine will fit perfectly here, which can be decorated using quilling patterns. We'll talk about this technique in more detail below.

You can also sew an egg from fabric yourself.
Also, for variety, first cut out a shape from cardboard, and then, by smoothing it over the surface, lay it out and decorate it with any patterns.
Ball plasticine is now available for sale, you may have already heard about this one. So I propose to make such a craft from it, using an ordinary eggshell as a basis. In this matter, you need the help of adults, so that the white and yolk come out, pierce the egg with a stick.

You can hide a note even with a message. Well, that's it, between the lines.

Well, now I actually decorated the egg with such a miracle.


In fact, you can simply decorate an egg beautifully using all sorts of decorative things, such as stickers, for example. Everyone without exception likes this kind of work.

You can use thermal stickers, but this should only be done at home and only with adults, so as not to get burned.

Secondary school students can build something more complex, for example, such a composition for an exhibition.

For this, use cardboard, scrap paper and all kinds of decors, such as openwork ribbons.

Or even in this scrapbooking technique.

Or this one made from threads and coffee beans:
And if there is something simpler and at the same time unusual, then you should like this idea. Take colored plain napkins and cut them into small rectangles, and then you have to crumple each shape in your hands.

Cut out a chicken from paper and tie a ribbon or thread around its neck and tie a bow.

Now all that remains is to connect all the parts, glue them with glue.


It will turn out fun and beautiful!

You can create a whole composition.


You can use a large kinder egg and simply cover it with paper napkins, or rather pieces, as if it were decoupage. You will need good glue - PVA.

Children will be happy to make such a souvenir.

It turned out great!

Do you need a glamorous idea for this craft? Then I am happy to offer you this option. I think you see something similar in stores, the other day I came across such a beauty in a fixed price.

How to make an egg from threads and a ball for Easter 2020?
It's very simple and easy. I think everyone has seen such a toy at least once, and maybe even made it themselves. If you want to learn this art, then read this master class.
We will need:
- foam egg
- threads
- tassel
- cling film
- liquid glass

Stages of work:
1. Prepare all materials for work, and then take the workpiece and wrap it in plastic wrap.
Important! If this is not done, the threads will stick to the foam form.
Stick the needles in this way.

2. Then start creating patterns by interweaving the threads in a random pattern. Notice that another row of needles has appeared.

3. After you have finished the work, first lubricate the threads with glue, and then go over it with liquid glass.

4. Let it dry well, and then remove the first piece - half.

5. Now build the second part in the same way; you can arrange the needles differently, depending on what you want the result to be.

Then you have to glue the two halves together or you can use adhesive tape.

Models can be completely different.

In this scheme, instead of a foam ball, an air balloon is used. Then it is simply pierced with a needle. Here you don’t need to use liquid glass; use glue.

Remember, last time we did this))).

If you inflate a small balloon, you can get something like this.

Egg using modular origami technique (step by step instructions)
Modular origami is a type of technique in which the craft is assembled from special triangles. The main thing is that no glue is used here at all.
The module is made like this.

And then you start combining them one by one, alternating colors and making imaginary patterns.

And in order for you to learn the whole technology more clearly, I suggest watching this video from the YouTube channel.
It can be a white egg, with multi-colored circles around its entire diameter.

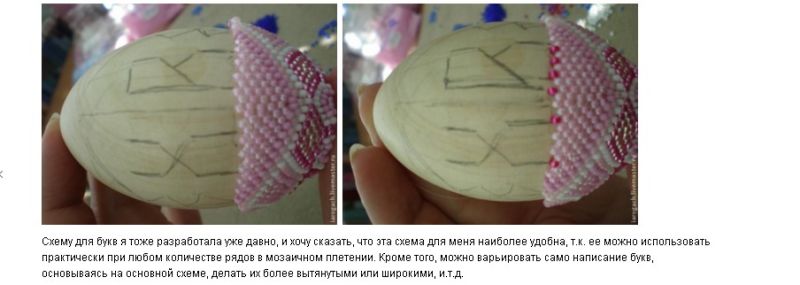
You can write letters symbolizing the holiday.

It can even be done on a stand, using the same triangular modules.

In general, you can do a lot of things, the main thing is that it will be beautiful and cool.

It will cheer you up, and such a paper egg will definitely never go missing and will delight you on the shelf for a single year.

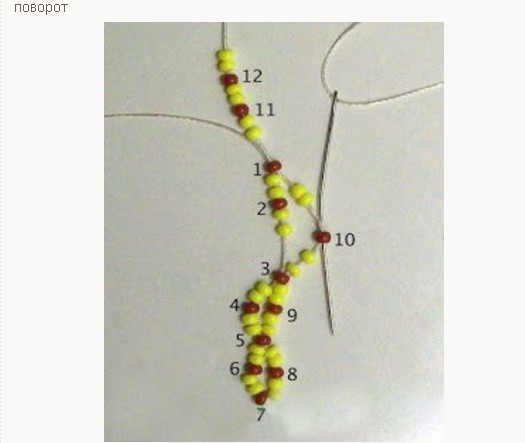
Beaded Easter egg with weaving pattern for beginners
It’s very cool to make such cool things and then give them away. It won’t be too difficult for beginners to master this technique, but they will need a lot of patience and perseverance. And you can easily compose a plot or composition yourself, the main thing is to think a little and everything will work out.
Take any workpiece, the main thing is that it is dense and not heavy in weight, so that it is convenient to work with. For example, you can take an oval-shaped wooden blank.

Stages of work:
Make a flower according to the pattern.


These are such cuties, bravo to the master!

The easiest option is to make it from wire; make an oval out of it and thread diagonal strips. Then use the beads.

Come up with patterns and weave. This is a children's version).

You can also make it from beads and rhinestones-sequins and a base - paralon or polystyrene foam.

Do this so that there are no empty holes.


Decorate the tray or cup as well.

Also use this step-by-step instruction if you want to master this science.


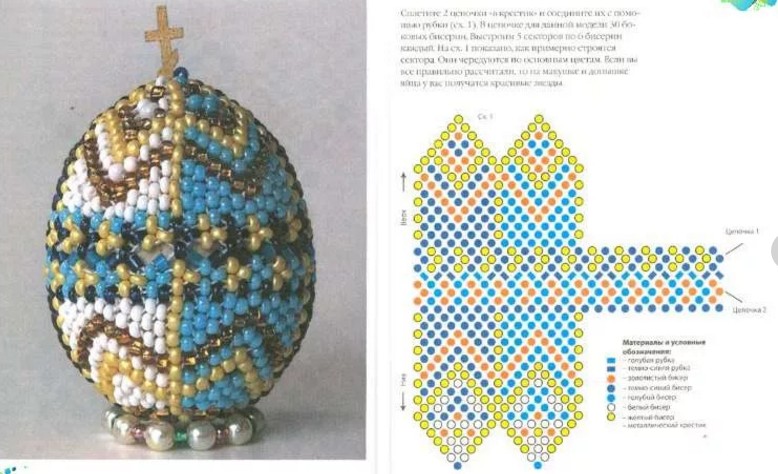
And now knowing some basics, you can use these schemes. This is such a blue decor, very cute and gentle.

You can even use large beads.

Or make an egg with pendants.


You can also choose an ornament scheme.

Or just do the work in a zigzag style.


In any case, you should be satisfied and so should those around you.


After all, then you can start inventing masterpieces yourself.

It's purely a matter of your imagination.

And only to your imagination.

Or set a goal and do what you like most yourself, but for this you need to find the right weaving pattern. I liked this egg chick. And I finally found knitting patterns from her.

If you also need it, write, I will send it to your email for free.
Knitted souvenir Crochet egg with pattern and pictures
If you are a fan of crocheting and knitting, then you will be able to do these product options.

Still, this one looks wonderful and divine.

Can be used as a cover or worn on an Easter egg.


You can make it in the form of a souvenir, like a ball on a string and hang it on a decorated tree.


I personally liked this weirdo that just hatched. I found his master class on the Internet for you.


Making a craft from satin ribbons in kanzashi style for a school competition
The first thing I want to show you is to watch this video.
I suggest to all those who want to learn how to work with fabric in an interesting way to master this technology - kanzashi. Also take as a basis any product with a three-dimensional shape that resembles an egg. And cut rectangular pieces from satin fabric.

2. Make a triangle out of a rectangle and stick it into the foam product with small special nails.


4. In principle, you can lay the fabric in any way, the main thing is that it looks aesthetically beautiful.

5. Take multi-colored materials, maybe with decorations and sparkles.

6. In the end, you will still reach the result you need, the style is called this artichoke.

7. What a beauty!

If you don’t understand something, take a look at this step-by-step description, maybe it will be more convenient and easier for you to understand.


You can go another way, arrange the triangles not like this, but like this, but for this the ends of the ribbon will need to be soldered a little, connected, do this with a wax candle, or rather a light.


Choose the option you like and get creative!

Create new images and motifs.

It's so fun and funny.

Even in mosaic style it looks cool too!


You can also design it in the form of a postcard; in the previous issue we did one.

Eggs using quilling technique
For this work, purchase everything you need, first of all, this is special paper in the form of strips.

Then roll the strip into a spiral onto the stick.

Glue the end with glue.

There can be any number of such patterns, here is an approximate table.

From all this you can put together a whole composition, these include flowers and all sorts of things.

And then glue it onto any egg, for example a foam one or one made from papier mache.

You can also, when you gain experience, make products without a base.

In fact, this is not difficult to do either. Make a frame out of paper, and then get to work and go.
Lubricate the parts well with glue.

After all the actions you will see a creative masterpiece.

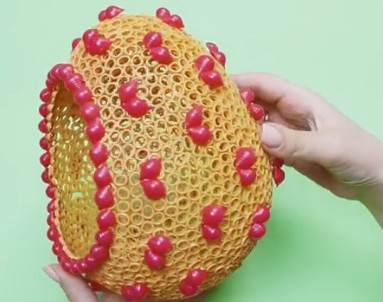
Beautiful egg made from pasta and balloon
There are now many such masterpieces on the Internet, so you can also check out one of them right now.
We will need:
- balloon - 1 pc.
- PVA glue
- spray paint
- nail polish
Stages of work:
1. Take a balloon and inflate it to the size you need.

2. Dip round rigoton pasta in PVA.

3. Draw an oval on the ball; this will be the future hole. And start laying it out carefully with tweezers, like a frame.

5. Let the product dry completely, and then deflate the balloon by piercing it with a needle.
6. Now you can start painting, spray.

7. You can paint shells with varnish - these are also noodles.

8. And then, how to make a headband by gluing it here.
9. In general, decorate as you please.

11. Well, that's all, it looks cool! Good luck!
All work, in principle, comes down to the same actions, only the images and backgrounds may be different.
Use different horns and you will definitely succeed, take several types, twisted and round, etc.
It is possible to make a special stand for such beauty, if there is a desire.
You can even lay out a brownie))).

How to draw an Easter egg + stencils for cutting and coloring
You can not only draw it yourself, but find a template and color it, plus make a chicken, cut the egg in half and another trick, it will open.
You need to color with any colored pencils or felt-tip pens. You can also use elements of gouache and watercolor.

It turned out wonderful for the students.

Now choose, take any model you like. It can be painted and decorated with anything. There are of course options for children of different ages.

R.S Well, in conclusion, it turns out they are also made from mosaics and glass.

By the way, if you like felting wool, you can take this masterpiece as a basis.
This is how the note turned out, small, but with interesting and new ideas, may everything work out for you! Good luck and patience! Thanks everyone and bye! Like and subscribe to the group in contact.
Summary: Children's crafts for Easter. Easter chicks. Easter chickens. Easter chick. DIY Easter souvenirs. Children's crafts for Easter. Easter chicken.
Easter is a family holiday, when many friends and relatives gather around the same table and children run around. At Easter, it is customary to make and give each other small gifts (DIY Easter gifts): Easter baskets with painted or decorative eggs, Easter cakes, Easter souvenirs - Easter chicks, hens, bunnies. It is especially interesting for children to participate in preparing for the holiday and making Easter crafts with their own hands.
In our previous articles, we talked about how to paint eggs for Easter, how to decorate Easter eggs, and how to make Easter baskets with your own hands. Read our articles:
In this section you will find instructions for making children's crafts for Easter. Together with your child, make DIY Easter souvenirs for relatives and friends.
1. Easter master class. Easter chickens. Easter chicks

2. DIY for Easter. Easter chicks
Option 1.
It's super easy to make an adorable Easter chick using pom poms.

You can make an Easter chick from two or one pompom.


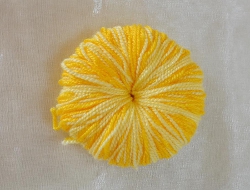
How to make a pompom from yarn? To do this, cut out two identical rings from cardboard. Place them together and wrap them in a circle with several layers of yarn (see photo below). This is what you should get as a result.
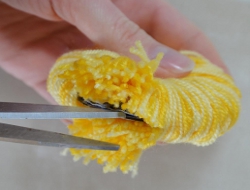

Now cut the pompom blank in a circle with scissors and tie it in the center with thread. All you have to do is trim the pompom with scissors so that all the threads are the same length, so that the pompom is even and beautiful.

If you are going to make an Easter chick from two pompoms, then you will need to make another slightly smaller pom pom for the head. But you can get by with just one pompom. Easter chicks made from one pom pom also look very cute. Judge for yourself!

An interesting idea is to glue bamboo skewers to eggshells and place store-bought or homemade Easter chickens in the shells. This craft can be used to decorate pots with homemade flowers or sprouted wheat for Easter.

Option 2.
You can also make an Easter chick from a cardboard egg carton.


For a detailed Easter master class, see the photo below.
Option 3.


Paper craft for Easter - 3-D paper model of a chicken in an Easter egg from the Singapore website of Epson. You can download the template from the link >>>>
3. Children's crafts for Easter. Children's crafts for Easter

We continue to tell you about interesting children's crafts for Easter.
Balloon
These funny Easter chicks are made by hand using the papier-mâché technique.
For those who are not familiar with this technique, we will tell you in more detail how to make them.
For this Easter craft you will need:
- plain paper or newspaper
- corrugated paper yellow and white
- PVA glue
- any fatty cream or Vaseline
- felt, satin ribbons
How to make your own Easter chick:
1. Inflate a small balloon. For ease of handling, hang it on a string.
2. Lubricate the ball with fat cream or Vaseline.
3. Cut or tear plain paper or newspaper into small pieces.
4. Dilute PVA glue with water in a ratio of 2:1. Apply glue to each piece of paper and cover the ball on all sides in several layers.
The pieces should overlap each other.
5. In the same way, cover the ball with several layers of yellow corrugated paper. Decorate at the end with circles cut from white crepe paper.

6. Leave the chicken preparation to dry for at least a day.
7. Deflate and remove the balloon from the craft.

Cut the cardboard roll lengthwise and cut off a small segment from it so that it becomes like an arch (or tunnel).

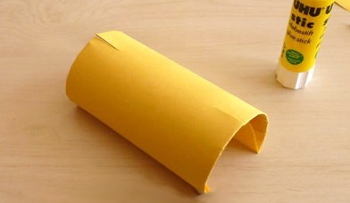
Cover it on all sides with yellow paper or paint it with yellow paint. This will be the body of the Easter chicken.


